Frequently asked questions

See also our YouTube Channel.

Filter

Search
Target

ID on the target lift is set using jumpers on the target lift card. See the document ML2000Man02EN-Installation for more information.

Somethimes an error in the system sets the motor length for the band advance to zero. To avoid this we recommend to power on the targets first, then power on the monitors.

In MLRange goto Menu -> Setup -> Targets. 

A monitor can be connected directly to the 3D-Score 25/50 connection bar for troubleshooting. Only the lastest version of color monitor can be used. Version can be checked on the monitor Systemstatus -> Hardware: DU3 i1.

During normal operation a green diode blinks with a period of a couple of seconds. If the diode blinks rapidly this may indicate too low voltage.

During activity on the communication line a red/orange diode blinks. The frequency is affected by the number of units communicating on the same communcation line.

Two green diodes blink whenever the microphone has detected a sound. One with a short blink and one with a longer blink. (Diodes may be red/orange)

Seen up front:

3UXXX


    A    B    C


4KXXX


    B    D


    A    C


8K000


    B    B2    D


    A2        D2


    A    C2    C


BIA1200:


    U1    U2    U3    U4        D1    B1    D2    B2

                           =

    L1    L2    L3    L4        A1    C1    A2    C2


BIA1200_12


    U1    U2    U3    U4    U5    U6        B1    D1    B2    D2    B3    D3

                                        = 

    L1    L2    L3    L4    L5    L6        A1    C1    A2    C2    A3    C3


Shot detection in the 3D-Score depends on the IR-diodes and sensors inside the target.

Use the camera on a cell phone to determine that there are IR-light in all the slots inside the target. Please note that only half of the slots contains IR-diodes with light visible on the camera. The other slots contains IR-sensors with no ligth. 

On the small 3D-Score you will need to enable the IR-diodes:

1. Unplug the power
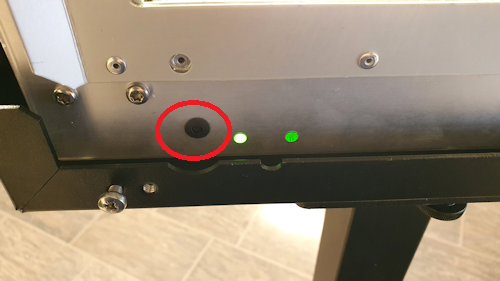
2. Press and hold the button on the rear side of the target while reconnection the power

First model LEDs on the 4K187
The first model LED target lights cannot be adjusted. These LEDs have only 2 wires, while the adjustable ones have 3.
Last model LEDs on the 4K187

On the new LEDs the lights are connected to a small PCB with a button. This button is used as follows:

  • Press to turn on and off.
  • Hold for a few seconds. Then you can adjust between 6 different levels by short push.

Target lights on the 3D-score target for 10m and 15m

On the monitor, enter the following menu:

Menu → System setup → Adjust target illumination

I MLRange:

Setup → Adjust target illumination

- Only master monitor can be used to set ID on the target.
- Make sure only ONE target is connected when setting the ID.
- The interval (from/to target) for master MUST include the target you want to set ID on. The communication indicator on the master will only show status for the target it is set to. If you want to see 
   the status for a different target, you need to change the target number on the master monitor to the one you set on the target. 

Menu → System setup  Comm. config...  To change lane number on the monitor

Menu  System setup  Advanced (password = 3) Set Target ID   To set the target ID for a target

All looks good, but I only have connection to target 1. 

There could be multiple causes. One of the reasons is that all target is set with ID = 1. 
To check this do the following:

1. Turn off all monitors.
2. Bring the master monitor and connect it to the communication box at the targets. 
3. Disconnect all targets except target 2.
4. Check if Master 1 have contact with target 1. IF yes, target 2 is set with target ID 1.
5. Change ID on Master monitor to 2. (Menu → System setup → Comm. config..)
6. Set new ID on the target (Menu → System setup → Advanced (password = 3) → Set Target ID)
7. Check that you have connection with target 2.
8. Do this for all targets. Only one target connected at a time when setting ID.

The following target center positions is recommended:

  • Prone: 30-40cm
  • Kneeling: 70-90cm
  • Standing: 140cm (according to ISSF rules)


One push of the button on the circuit board will activate the demo-mode. The lift automatically moves between the three positions (P-K-S-K-P….). A second push of the button disengages the demo-mode.

LEDs on the lifts circuit board indicates the following:

·       Orange LED inside the card (Rx)
Flashes when the board receives data from the firing line

·       Green LED inside the card (Tx)
Flashes when the board sends data to the firing line.

·       Green LED on the bottom of the board (Power)
- Lights up when the current is OK and no message is received.
- Flashes slowly when the board is in demo-mode og no message is received.
- Flashes rapid when power disappears
- Shuts down for 0,5 seconds when receiving a message

·       Orange LED on the bottom of the board (Diagnose)
- Lights up at start-up, but should go out when start-up is successful
- Flashes ones when storing data in a power out situation
- Flashes fast in the event of an unexpected event on the motor driver. This is reset at the next motor start.
- Flashes more slowly at high current draw (only with new type of motor driver)


The fiber cable we normally use is 50/125 Mulitimode cable. We cannot use singlemode cable!el.

OM2 and OM3 cable can be used. OM describes the cable's quality. OM3 is better than OM2. They can also be mixed.

Range / Monitors

Procedure for factory reset / recovery is changed. Please see the document ML2000 Manual – Display Unit (Monitor)  for more information.

Select Menu → Display Config → Language

or

Select Meny → Skjerm innstill → Språk

When the gauge is to small to be visible, an additional colored circle is added to the plot. Se explanation here: Plotting of shots


LED marked USB: The LED is blinking each 5 secound and for each message when connection to MLRange. The connection can be testet by sending a message from MLRange or fetch status.

LED marked LINE/PWR: Lights when the adapter is powered. The LED is blinking when the adapter communicate with monitors/targets.

Check the power supply. May be caused by poor voltage in the cabinet. Color monitors must have a new power supply as these require more power than black/white monitors.

If the monitors are in competition mode, the menu buttons does not show, it can be put into training mode in one of the following ways:

  1. From MLRange:
  • Choose File → Events... In the window that appears, choose Practice mode.
  • Command → For one lane → Practice mode can be used to show the menu on a monitor without changing the score card. This can be practical to use during a competition if you need to do something on one of the monitors.

    2. On the monitor:

  • Hold A button in for 5 seconds and push D button while A is kept in. In 1-2 seconds the menu will appear.
  • Make sure MLRange isn't running, because that will block the possibility to change mode on the monitor.
  • On versions from 10.xx-14.xx you could try the key sequense C-C-D-D-C

Filesystem on the memory stick must be FAT or FAT32.
You can check the file system by looking at the properties for the memory stick. To change the filesystem the stick must be formatted (all content on the memory stick will be deleted).

The vast majority of memory sticks seem to work. A very few have strange partitions that can be difficult to delete.

Only Master monitor can be used to set target ID. Remember to only have ONE target connected when setting ID!

Rev 1: Not marked with Rev. No. In principle, these behave the same as previous serial port adapters.

Rev 2: Handles higher speed (which is used for BIA competitions)

Rev 3: Power supply must have the correct polarity (NB! this can cause problems with aluminum wall connection)

Rev 4: Withstands higher operating voltage (required for 3D-Score with MLShoot)

Check if filter is turned on. 

Menu → System setup → Advanced → Filter Config... 

Change to "ANY" in organization 1 and 2. 

Software

The license code consist of:

  • License name. This is usually the name of the association or facility. The name appears on various screens and printouts. The name must be written exactly as indicated in the license information (spaces and upper/lowercase letters)
  • License code. This is normally a code of 8 characters (the numbers 0-9 and the letters A-F).

Every year we switch to new license codes. The new codes only apply to new versions. It means:

  • That a license code does not expire, but is linked to certain versions. Normally, e.g. license codes for 2015 work for all version 15.xx of the programs.
  • When you upgrade (at least with new main versions such as, for example, from 14.24 to 15.10) you must check that you have the correct license codes.
  • If you have the wrong license code, some functions in the programs will work, while other functions will not work (communication, printing, display of real shots, WEB generation, etc.)

Each program has its own codes. Certain programs also require a HASP security key (USB stick). Programs that require more than a simple license code are:

  • MLShoot requires HASP
  • Sius Ascor functions in MLRange require HASP and 16 characters in the license key

Edit 03-2024

* The computer must be able to run minimum Windows 10. We higly recommend Windows 11.
* We recommend PRO-version of Windows.
* The harddrive must be an SSD drive

-------------------------------------------

MLRange, MLRes, MLLive and MLLiveArena run on almost all newer Windows machines. As Microsoft cuts support for old Windows versions, we will also have problems supporting these. We usually manage to get the software stable on the latest Windows versions quite quickly, but there will always be problems with drivers etc. as soon as new Windows versions come out.

It is sufficient for our software that Windows runs smoothly on the machine. We do not set strict requirements for capacity.

The performance of MLRange is largely dependent on writing speed to disk. A good SSD disk can therefore be useful, but make sure that there is plenty of free space on it so that it does not wear out quickly. You can leave Windows on a spinning disk and put the Megalink folder on the SSD disk.

The PC that will run MLRange must have free USB ports for USB adapters. Remember that keyboards, mouse, printers, memory sticks etc. mean that you quickly run out of ports. Try to avoid using USB hubs for our adapters. Some USB hubs must have an additional power supply to be able to power the USB adapters.

It is also good to have a usable resolution on the screen so that you have a large work surface. We recommend a minimum of 1280×1024, although it may be possible to use 1024×800.

MLRange

MLRange do not support multi channel USB adapter by default. To use the new adapter do the following:

1. Open the file MLRange.ini in the range folder. 

2. Modify this line:
#UseUsbDll=0

3. To this:
UseUsbDll=1

Reason:
- If you have ticked off for Automatic Discipline Assignement, it's not possible to change discipline

Solution
- Untick the box for Automatic Discipline Assignement and try again

The Timer-button in MLRange will have different functions for all events with Red/green light in 25m pistol, depending on the choice "Splitt timer button". This choice is located in the dialog box "Setup → Event"

  • Splitt timer button:
    • Use INSERT button on the keyboard when the command "LOAD" is said
    • Use HOME button on the keyboard about 3 sekonds prior to the command “ATTENTION”
  • No splitt timer button:
    • Use HOME button on the keyboard when the command "LOAD" is said
    • After 60 seconds (when countdown reaches 0) say the command “ATTENTION” without hitting any buttons


This can occur on Windows 11 computers. Try do turn of the Memory Integrity setting. 

1. Goto windowsdefender://coreisolation/
( Or Start -> Settings -> Privacy & Security -> Windows Security -> Device Security -> Core isolation -> Core isolation details )

2. Turn the Memory Integrity setting Off. You'll need to restart your computer for the changes to take effect.

MLLiveArena

MLLiveArena is a new and more simple system for audience display. MLLiveArena is working like the MLLive App, but with local storage. Internett is not required. 


If MLRange do not automaticly connect to the MLLiveArena application you can force MLRange to use the IP address of the MLLiveArena PC.

  • Close MLRange
  • Open the file C:\Megalink\Range\MLRange.ini
  • Find the config [LiveArena] and the line #ip=
  • Change the line to:
  • ip=xxx.xxx.xxx.xxx

Example:

[LiveArena]
ip=192.168.128.43


If LiveArena and MLRange is running on the same computer without nettwork, use the ip 127.0.0.1

If you are running LiveArena localy on the range computer, MLRange wont connect. You will have to tell MLRange to search locally.

This can be done by modifing the MLRange.ini config file:

  • Close MLRange
  • Open the file C:MegalinkRangeMLRange.ini
  • Add a new config named [LiveArena]
  • Make a new line bellow the [LiveArena] section:
  • ip=127.0.0.1

Example:

[LiveArena]
ip=127.0.0.1


Here is how to make an url to selected targets instead of the complete range on live.megalink.no:

1. Select your event at live.megalink.no

2. Select wanted range. F.eks: https://live.megalink.no/#!/event/100m

3. If you want an url to target 3, 4 og 8 you can change the url to this: https://live.megalink.no/#!/event/100m/3,4,8

4. Share the URL with anyone :) 

The PC running the server needs Windows 10 or newer. 

The clients need an updated web browser.

On live.megalink.no, it’s possible to display results from two or more competitions simultaneously.

At the bottom of the menu, there are two buttons next to the text “Split screen.” These buttons allow you to split the screen horizontally or vertically.


If you want the same two images to open every time, you can use a predefined link. For example:

You can then use the following predefined URL: https://live.megalink.no/split.html?url1=https://live.megalink.no/%23!/usa-shooting/lower-range-comp-1/36,37,38&url2=https://live.megalink.no/%23!/vestby-skl/100m

Note: The “#” symbol in the link cannot be used directly. Instead, replace # with %23 in the combined URL.

If you prefer a vertical split, you can replace “split.html” with “split-v.html” in the URL. 
 
MLShoot

To move the average to center press [F12] or select "Ballistic test mode" in the "Ballistic test" menu. 

To make a report press [Ctrl] + [P] or select Menu → Print.

It's recommended to use the course of fire "Testing". To show a cross instead of a target select the target named "International Ballistic test".


Tip: In the meny Ballistic test → Ballistic test config the options Name cards and Name series should be selected.

To make MLShoot allways start in ballistic test mode select BTS mode on startup in the config menu.

(Works on MLShoot v.17.42 or newer)

To remove a shot press [F9] to get the shot details list. Activate or deactivate each shot by cliking on them.

Select Menu → Display Config → Language

or

Select Meny → Skjerm innstill → Språk

The problem is that the driver for the HASP dongle is not corectly installed. 

- Check first that the dongle is connected to the computer. 

To solve the problem try the following:

1. Remove the HASP driver in the Device manager (if you find it there)
2. Unplug the HASP dongle
3. Reboot the computer
4. Install MLShoot
5. Insert the HASP dongle and start MLShoot

Biathlon

When the event database grows, the software can start to respond slowly. It’s therefore recommended to clean the database before new events.

Do the following:

  • Make sure MLBiaWeb is not running.
  • Start MLBia.
  • Press the setup icon: 
  • Then press the “Clean Database” button: 

NB: This will delete all old events. But the old database is backup-ed to the folder MLBiaDbackup.

MLView – MLView is obsolete and no longer maintained. Replaced by MLLiveArena.

The Megalink logo can be replaced by one or more banner images.


The images can be placed in the BannerImages folder, a subfolder of the C:MegalinkView folder. The images must be of BMP format and have a size of 500x100 pixels. The files must have the following naming: image1.bmp, image2.bmp, etc.

MLLive – MLLive is obsolete and no longer maintained. Replaced by MLLiveArena.

If MLRange do not automaticly connect to the MLLive application you can force MLRange to use the IP address of the MLLive PC.

  • Close MLRange
  • Open the file C:Megalink angeMLRange.ini
  • Make a new line bellow the [CONFIG] section:
  • MLLiveIP=xxx.xxx.xxx.xxx

Example:

[CONFIG]
MLLiveIP=192.168.128.43

NB: Make sure there are no on the start of the line.

An event with 10 relays, 10 targets and an average of 35 shots per shooter gives an upload of approximately 40 MB.

MLLive must be installed on Windows 7 or newer.

Here is how to make an url to selected targets instead of the complete range in MLLive:

1. Go to mllive.megalink.no

2. Select one ore more targets in the same range. The url will be mllive.megalink.no/#!/event_name/100m/

3. To allways show for instance target 3, 4 and 8 every time you can change the url as follows: mllive.megalink.no/#!/event_name/100m/100m_3,100m_4,100m_8

4. Save the url as a bookmark.

1. Goto Settings --> Safari --> Clear History and Website data.

2. Reload results.megalink.no

Other

API for getting latest software bundle version and date:

http://www.megalink.no/login/api.php?c=get_sw

Returns JSON

© Megalink 2016 - 2024
We're using cookies [Read more]